
Filling, Purging & Pressurizing your System
Why Proper System Setup Matters for Your Radiant Heating
For your radiant heating system to keep your home warm and comfortable, it needs to be filled, cleaned of air, and pressurized the right way. While that may sound technical, it plays a big role in how well your system performs day to day.
Air trapped in the system can cause cold spots on your floors, strange noises, and reduced efficiency. It can also put extra strain on the pump, potentially leading to costly repairs. By removing that air, your system can circulate heat evenly—so every room feels just right.
Proper pressure is just as important. It helps your system run smoothly, prevents overheating, and ensures water flows where it should. When everything is balanced correctly, your system doesn’t have to work as hard, which can help lower your energy bills.
Regular maintenance keeps your system running reliably and extends its lifespan. In short, a properly set up and maintained radiant heating system means better comfort, fewer problems, and more savings over time.

Fill / Purge / Pressurize Your System
After everything is installed and connected, it is time to introduce fluids into the system and purge the air out of the system.
What You Will Need:


*Note: 100 feet of 1/2" Tubing will require approx. 1 gallon of fluids
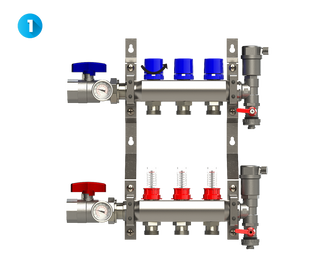
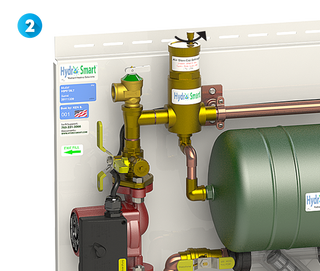
System Overview
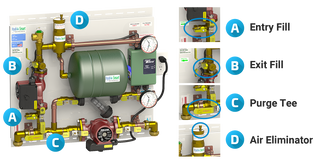
PANEL DETAILS


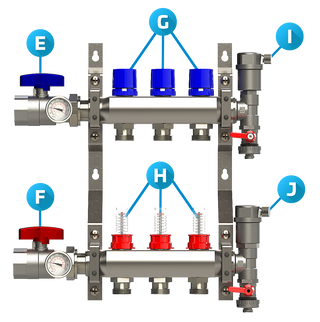
MANIFOLD DETAILS


BEFORE FILLING THE SYSTEM
ON THE SYSTEM

1. Connect Hoses to the System
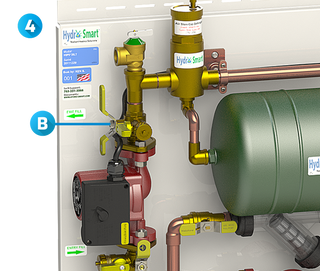
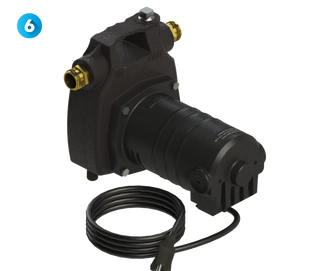
• Attach Hose 1 to the OUT on the TRANSFER PUMP and connect to ENTRY FILL (A)
• Attach Hose 2 to the IN on the transfer pump and run into the bucket
• Attach Hose 3 to the EXIT FILL (B) and run into the bucket
• Fill 5 gallon bucket with Distilled Water/Propylene Glycol
2. Make sure the PURGE TEE (C) is in the vertical position
3. Close AIR ELIMINATOR (D) by turning air stem cap clockwise
ON THE MANIFOLD
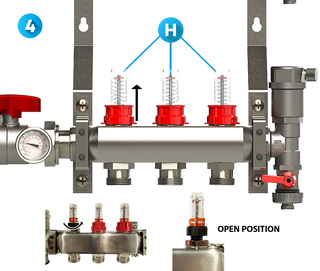
4. Verify all FLOW METERS (RED/H) are fully OPEN
(Pry locking ring up and turn CCW until fully open then push down locking ring to lock into position)
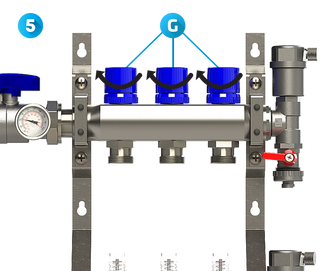
5. Verify all LOOPS (BLUE/G) are CLOSED on the manifold by turning CW
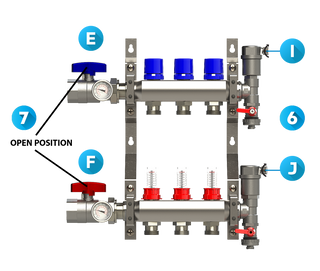
6. Verify Air Eliminator Valves
(I & J) are CLOSED (CW)
7. Verify Return and Supply Shutoff Ball Valves
(E & F) are in the OPEN position
FILLING THE SYSTEM
PURGING
1. OPEN the FIRST LOOP* by turning Blue Cap Counter Clockwise (CCW) then turn on TRANSFER PUMP
NOTE: Each loop will take approx. 2-3 minutes to purge. *The number of loops will depend on your system.
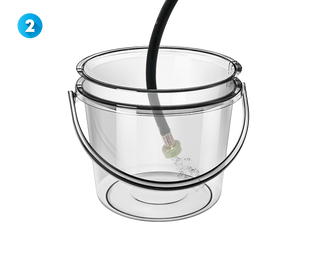
2. Observe air bubbles in the bucket dissipating for removal of air.

3. When air is purged out, CLOSE LOOP by turning Clockwise (CW)
Repeat steps 1 - 3 with each remaining loop until all loops have been purged
PRESSURIZING
4. With the transfer pump still running, CLOSE off FILL EXIT POINT (B) valve and the pressure will rise.
NOTE: Leave at least ONE LOOP open, otherwise the system will not pressurize.
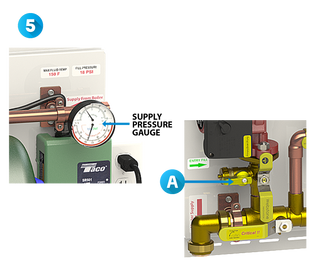
5. When supply pressure gauge shows 16-22 PSI, CLOSE OFF FILL ENTRY POINT (A)
3. Turn off transfer pump and remove hoses.
YOUR SYSTEM IS NOW PURGED AND PRESSURIZED!
BEFORE BOILER OPERATION

1. Rotate PURGE TEE (C) to horizontal position
2. Rotate AIR ELIMINATOR (E) stem cap screw counter clockwise 1 turn